Making your own cannabis tincture is a classic, time-tested method for a reason. At its core, you’re simply soaking cannabis in high-proof alcohol or glycerin to pull out all the good stuff—the cannabinoids and terpenes. It’s a process you can easily do right in your kitchen, and the result is a potent, smokeless liquid that offers incredibly precise and discreet dosing.
Why Bother Making Your Own Tincture?
When you learn how to make your own cannabis tincture, you get total control. You pick the strain, you decide the strength, and you choose the base liquid. Want a fast-acting, super-potent tincture? Go with high-proof alcohol. Looking for something a little sweeter and alcohol-free? Glycerin is your friend. This isn’t about just following a recipe; it’s about crafting the exact experience you want.
Beyond the custom-fit, homemade tinctures are also incredibly practical. They are one of the most budget-friendly and versatile ways to consume cannabis. A single batch can last you for months—or even years—if you store it right. The final product is discreet, easy to dose, and a fantastic smokeless option for anyone, whether you’re using it for wellness or recreation.
What Makes Tinctures So Great?
So, why choose a tincture over, say, an edible or a vape? They have a few key advantages that are hard to beat.
- Dosing Down to the Drop: The dropper is your best friend here. It lets you measure out the exact amount you want, so you can find your perfect dose and replicate it every single time. No more guesswork.
- Quick Onset: When you take a tincture sublingually (a few drops under the tongue), the cannabinoids get absorbed straight into your bloodstream. You can often feel the effects in as little as 15-30 minutes.
- They Last Forever (Almost): Alcohol is a fantastic preservative. A properly stored, alcohol-based tincture can hold onto its potency for years, making it a reliable staple to have on hand.
- Stealthy and Simple: A small dropper bottle fits in any pocket or bag. You can use it anywhere without drawing attention—no smoke, no smell.
Tinctures aren’t some new fad; they were a cornerstone of medicine cabinets for decades. The technique of using high-proof alcohol to extract cannabinoids was common practice back in the 19th century. Alcohol is an amazing solvent, perfectly suited for pulling out compounds like THC and CBD while also making them more available for your body to use. You can dive deeper into the history and market potential of tinctures with Jarsking.
By making your own, you’re not just saving money—you’re connecting with a reliable, classic method that delivers consistency you can count on.
Getting Your Gear and Cannabis Ready
Before we get into the fun part—the actual infusion—we need to do a little prep work. Think of it like mise en place in a professional kitchen. Getting everything organized first makes the entire process go smoother and guarantees a better final product. A little effort now pays off big time later.
First, Choose Your Cannabis
The quality of your tincture really comes down to the quality of the cannabis you start with. You’ve got a few solid choices, and none of them are wrong; it just depends on your budget and what you’re aiming for.
- Flower (Buds): This is your top-shelf option. Flower has the highest concentration of cannabinoids and terpenes, which means a more potent and flavorful tincture.
- Trim: These are the sugary little leaves you trim off the main buds. They’re less potent than flower but are a fantastic, budget-friendly way to make a great tincture without using your best stuff.
- Shake: It’s all the little bits and pieces that fall to the bottom of your stash jar. Don’t let it go to waste! Shake works perfectly well for tinctures.
No matter what you choose, the prep work is the same. If you want to get a better handle on the different parts of the plant, our guide to understanding cannabis flower is a great place to start.
The Most Important Step: Decarboxylation
Okay, listen up, because this is the one step you absolutely cannot skip. Raw cannabis has cannabinoids like THCA and CBDA, which won’t give you the effects you’re looking for. To convert them into the good stuff (THC and CBD), you have to gently heat your cannabis. This is called decarboxylation.
If you skip this, your tincture will be incredibly weak and pretty much useless. Thankfully, it’s super easy to do right in your kitchen oven.
How to Decarb Your Cannabis:
- First, preheat your oven to 240°F (115°C). We’re going low and slow here to protect those precious, flavorful terpenes.
- Break your cannabis apart into small, pea-sized chunks. Don’t grind it into a fine dust—that’ll just make it a nightmare to strain later on.
- Spread the cannabis out in a single, even layer on a baking sheet lined with parchment paper.
- Bake it for about 30-40 minutes. You’re looking for a light, toasty, golden-brown color. Your kitchen is going to smell amazing, by the way.
- Once it’s done, pull it out and let it cool down completely before you do anything else.
Pro Tip: Your oven might be lying to you. I highly recommend grabbing a cheap oven thermometer. Home ovens can easily be off by 20-25 degrees, which could mean either under-cooking your cannabis or burning off the very compounds you’re trying to preserve.
The Tincture Maker’s Checklist
With your cannabis properly decarbed and cooled, it’s time to gather the rest of your tools. Having everything ready to go will make the infusion a breeze.
Here’s a simple table outlining what you’ll need for either an alcohol or glycerin-based tincture.
Essential Supplies for Tincture Making
| Item | Purpose | Pro Tip |
|---|---|---|
| Decarbed Cannabis | The active ingredient for your tincture. | Use 7-14 grams per cup of solvent for a good starting potency. |
| High-Proof Alcohol | The solvent for extracting cannabinoids. | Look for Everclear (190-proof) or another grain alcohol. Avoid rubbing alcohol. |
| Food-Grade Glycerin | An alcohol-free solvent alternative. | Glycerin makes a sweeter, less potent tincture but is great for those avoiding alcohol. |
| Glass Jar with Lid | Your infusion vessel. | A standard Mason jar works perfectly. Make sure the lid seals tight. |
| Cheesecloth or Fine Mesh Strainer | For filtering out the plant material. | Double up the cheesecloth to catch even the smallest particles for a cleaner tincture. |
| Dropper Bottles | For storing and dosing your final product. | Amber or dark-colored glass bottles will protect your tincture from light degradation. |
| Oven & Baking Sheet | For the decarboxylation process. | Line your baking sheet with parchment paper for easy cleanup and to prevent sticking. |
Once you’ve got all your supplies checked off, you’ve laid the groundwork for a fantastic homemade tincture. Now, you’re ready to start the infusion.
Mastering the Classic Alcohol Tincture
When you want a truly potent and effective cannabis tincture, the classic alcohol method is the gold standard for good reason. Using high-proof alcohol as your solvent is just incredibly efficient at pulling all the good stuff—cannabinoids and terpenes—from the plant. The result is a powerful, fast-acting tincture that really works.
Let’s walk through the two best techniques to get it done right.
And remember, the strain you choose really matters. It’s worth understanding the differences between Indica and Sativa so you can create a tincture that perfectly matches the effects you’re looking for. That’s the real beauty of making your own at home.
The Patient Path: The Cold Method
The cold method, or what I like to call the “long soak,” is perfect if you’re not in a hurry. It’s a very hands-off approach that lets time do all the heavy lifting for you. This slow, gentle process is fantastic for preserving those delicate terpenes that give your tincture its unique flavor and aroma.
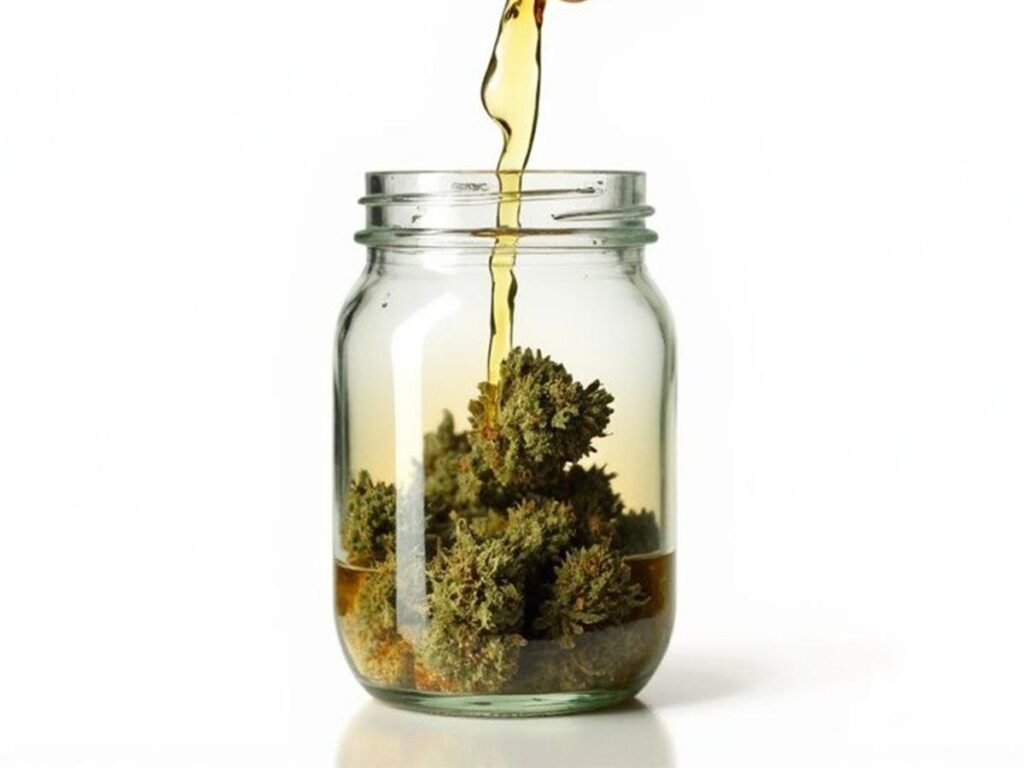
Getting started is simple. Just combine your decarbed cannabis and high-proof alcohol in a Mason jar, making sure the plant material is completely covered. A solid starting point is about one ounce of cannabis to two cups of alcohol, but feel free to tweak this for your own personal potency goals.
Seal the jar up tight and give it a really good shake for a full minute. Then, just stash it away in a cool, dark place like the back of a cupboard. All you have to do for the next few weeks is give the jar a good shake once a day. This daily agitation keeps the extraction process moving along. After about two to four weeks, it’s ready to be strained.
The Speedy Solution: The Warm Method
If waiting around for weeks isn’t your style, the warm method is your best friend. This technique, sometimes called the “Green Dragon” method, uses gentle heat to dramatically speed things up, giving you a finished tincture in about an hour. But you absolutely must be careful here.
Safety First:
- Never, ever use an open flame like a gas stove when you’re working with high-proof alcohol. It is extremely flammable.
- Make sure your kitchen or workspace is well-ventilated. Crack a window or turn on an exhaust fan to keep the alcohol fumes from building up.
- Stick to safer heat sources like an electric stove, a slow cooker, or a double boiler.
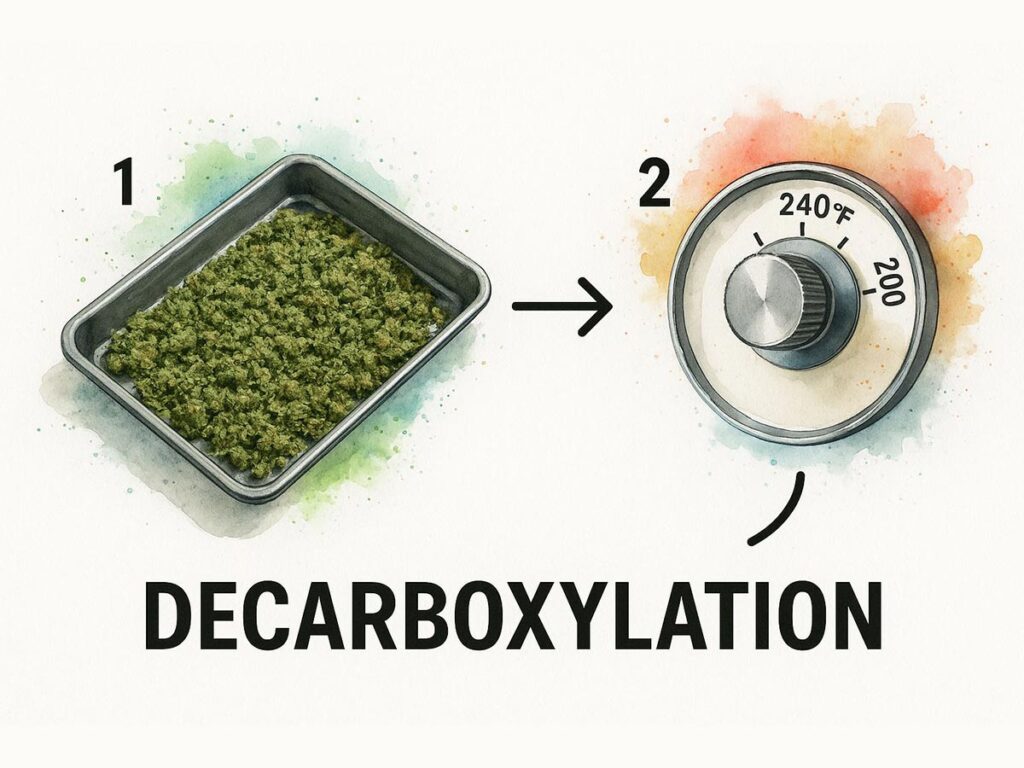
This image shows that crucial first step: decarboxylation. You have to heat your cannabis in the oven to activate the cannabinoids before you even think about extraction. 240°F is the sweet spot.
For this quick method, you’ll place your sealed jar of cannabis and alcohol into a pot of water or a slow cooker. You want to gently heat the water to around 170°F (77°C), but don’t let it boil. Let it sit in the warm water bath for anywhere from 20 to 60 minutes, giving the jar a little shake every so often.
The alcohol itself is the key to why tinctures work so well. It allows the cannabinoids to absorb directly into your bloodstream through the membranes under your tongue, which means you feel the effects much faster than with edibles. After the infusion time is up, carefully remove the hot jar and let it cool down completely before moving on to the straining step.
Making an Alcohol-Free Glycerin Tincture
If the sharp bite of a high-proof alcohol tincture isn’t for you, there’s a fantastic alternative: a vegetable glycerin tincture, often called a glycerite. Let’s be upfront: glycerin isn’t quite the powerhouse solvent that alcohol is, but it has a huge advantage. It creates a pleasantly sweet liquid that’s much easier on the palate.
To make this work, you’ll need to introduce some gentle, consistent heat. This coaxes the glycerin to pull out all those valuable cannabinoids and terpenes from your plant material. Using a slow cooker or a double boiler is perfect for this, as it keeps the temperature low and steady, preventing any damage to your final product.
Setting Realistic Potency Expectations
It’s crucial to know that glycerin simply can’t hold onto cannabinoids as effectively as alcohol. This means glycerites are naturally less potent. But that’s not a downside! For many people, a milder tincture is exactly what they’re looking for, making it ideal for microdosing or for those who prefer a more gentle experience.
Think of it like this: alcohol is an espresso machine, using high pressure to pull out an intense, concentrated shot. Glycerin is more like a slow cold brew—it still gets the job done and creates a wonderful product, but the result is smoother and less intense. The strain you choose also makes a big difference here; you can explore some of the top weed strains to maximize flavor and effect in our guide.
Infusing with Gentle Heat
Ready to start? You’ll need your decarboxylated cannabis and some food-grade vegetable glycerin. The process is pretty straightforward.
Slow Cooker Method
This is my go-to method for its simplicity.
- First, combine your decarbed cannabis and glycerin in a small Mason jar. A good starting point is about 1 cup of glycerin for every 7 to 14 grams of cannabis, depending on your desired strength.
- Seal the jar and place it in your slow cooker. Then, add enough water to the cooker so it comes up about halfway on the jar.
- Set your slow cooker to its lowest setting—”warm” is ideal if you have it—and let it infuse for 6 to 8 hours. You’re aiming for a temperature around 180°F (82°C).
- Give the jar a gentle shake every hour or so. This little bit of agitation helps the infusion process along.
It’s worth repeating: manage your expectations with a glycerin tincture. Because it’s a weaker solvent, you’ll likely need a larger dose to get the same effects as an alcohol-based one. On the flip side, its sweet taste and smooth texture make it a great choice for taking directly or mixing into your favorite drink.
Once the time is up, turn off the heat and let the jar cool down completely before you even think about handling it. From there, you’ll be ready for straining. This slow-and-low infusion is the real secret to a quality homemade glycerite.
Alcohol vs Glycerin Tincture Comparison
Choosing between alcohol and glycerin really comes down to your personal goals for potency, taste, and use. To make it easier, here’s a quick side-by-side comparison.
| Feature | Alcohol Tincture | Glycerin Tincture (Glycerite) |
|---|---|---|
| Potency | High | Low to Moderate |
| Taste | Sharp, bitter, “burns” | Sweet, pleasant |
| Shelf Life | Very long (years) | Shorter (about 1 year) |
| Extraction Efficiency | Excellent, full-spectrum | Moderate, less efficient |
| Best For | High-potency needs, long-term storage | Alcohol-free needs, direct consumption, sweetening drinks |
Ultimately, both solvents can produce a fantastic tincture. If you want maximum potency and longevity, alcohol is the clear winner. But if taste and avoiding alcohol are your top priorities, a sweet and smooth glycerite is the perfect solution.
Straining, Dosing, and Storing Your Finished Tincture
After all that patient waiting, it’s finally time to finish your tincture. This is where you separate the good stuff from the plant matter and turn your infusion into a clean, ready-to-use product. Getting this part right is just as crucial as the infusion itself.
First things first, you need to strain out the cannabis. I like to use a double layer of cheesecloth draped over a clean glass bowl or a big Pyrex measuring cup. Carefully pour the whole mixture through the cheesecloth.
Let it drip through on its own for a bit. Once it’s just a slow drip, gather up the cheesecloth and give it a good, firm squeeze. Don’t be shy here—a surprising amount of potent tincture gets trapped in that soggy plant material. For an exceptionally clean final product, you can even run it through a coffee filter afterward to catch any super-fine sediment.
Finding Your Perfect Dose
Alright, this is the most important part of the entire process: figuring out your personal dose. With any homemade edible or tincture, the mantra is always start low and go slow. Potency can be all over the map depending on your starting material and technique, so you have to approach this with respect.
Start with just one or two drops under your tongue. This is called sublingual dosing. Try to hold it there for about 60 seconds before swallowing; this helps it absorb directly into your bloodstream for a faster onset.
Wait at least two full hours before you even think about taking more. Seriously. This gives your body enough time to fully process it and lets you accurately gauge the effects. It’s the only way to avoid an accidental “oops, I took way too much” situation.
I highly recommend keeping a small journal. Jot down the number of drops you took, the time, and how you felt. The next time you try it, you can adjust by a drop or two until you find that sweet spot that gives you the exact effect you’re looking for. Patience is everything here.
Storing Your Tincture for Maximum Freshness
You went through all this effort, so let’s make sure your tincture stays potent for the long haul. Luckily, proper storage is simple. The two biggest enemies of your tincture are light and air.
Your absolute best bet for storage is a set of dark-colored glass dropper bottles. Think amber or cobalt blue. These are non-negotiable because they protect the precious cannabinoids from UV light, which will break down THC and CBD faster than anything else.
- Seal It Up: Always screw the cap on tightly. Oxygen is the enemy, and a tight seal prevents the oxidation that can degrade your tincture over time.
- Keep It Cool & Dark: Find a home for your bottles in a cool, dark spot. A kitchen cabinet, a medicine chest, or even the fridge will do perfectly. Just keep it away from sunny windowsills.
When stored correctly, a potent alcohol-based tincture can easily last for several years. If you made a glycerin-based version, you can expect it to stay fresh for about one year. Follow these simple rules, and the last drop will be just as good as the first.
Common Tincture Questions Answered
Even with a solid recipe in hand, a few questions always seem to pop up, especially when you’re just starting out. I’ve been there. Getting clear answers can be the difference between a so-so tincture and a batch you’re really proud of. Let’s dig into some of the most common hurdles people run into.
Why Does My Tincture Burn Under My Tongue?
If you’ve ever dropped an alcohol-based tincture under your tongue, you know exactly what I’m talking about—that sharp, fiery sting. Don’t worry, it’s completely normal. That burn is a direct result of the high-proof alcohol needed for an effective extraction. It’s actually a good sign that your solvent was strong enough to do its job.
While the burn isn’t harmful, it can definitely be unpleasant. Luckily, there’s an easy fix.
- Dilute it! Simply mix your dose into a little bit of juice, tea, or even just water.
- Swallow it instead. You can bypass the sublingual method altogether. Just add it to a drink and swallow it like an edible. It’ll take a bit longer to kick in as it goes through your digestive system, but the effects will be just as good.
This simple change makes potent tinctures much more enjoyable for daily use.
Can I Use Regular Vodka or Rum?
I get this question all the time. It’s tempting to grab that bottle of 80-proof vodka off the shelf, but I strongly advise against it. The magic of a good tincture is all about the solvent’s power to pull cannabinoids from the plant.
High-proof grain alcohol, like 151 or 190-proof Everclear, is almost pure ethanol, which makes it an incredibly efficient solvent for THC and CBD. Standard liquors like vodka and rum have a much higher water content. Water is terrible at extracting the good stuff and great at pulling out things you don’t want, like chlorophyll. You end up with a weak, grassy-tasting tincture.
For a potent and clean final product, stick to the highest-proof, food-grade grain alcohol you can legally get your hands on. If you want to see what the pros use, checking out a Vermont cannabis consumption lounge can give you a good idea of the quality standards for professionally made products.
How Can I Boost My Glycerin Tincture Potency?
Glycerin is a great choice if you’re avoiding alcohol, but it’s just not as strong of a solvent. This usually means the final product is a bit milder. But what if you want a more potent glycerite? You absolutely can make it stronger.
The best trick I’ve found is to do a second infusion. Once you strain your first batch, just take that finished glycerin and run it through a new batch of decarbed cannabis. You’re essentially doubling down on the cannabinoids, creating a much more concentrated infusion.
Another simple method is to just use more flower from the get-go. Bumping up the amount of plant material in your initial infusion will naturally give you a more potent result. Experiment with your ratios to find what works best for you.
At VT Strong, we’re passionate about helping our community succeed with high-quality products and solid advice. Whether you’re a first-timer or an old hand at this, we have the finest local cannabis for your next project. Visit us in Barre or browse our selection online at our cannabis store.